#BlocksWithMicrobit - A Beginner's Course to Learning Micro:bit
- Sep 7, 2018
- 3 min read
Hey guys, so if you haven't watch the live session earlier, we want to put it here so that you can watch the session straight from our website itself.
During the online session, we talked about quite a number of things, but we will summarize the most important parts of it here.
This is online stem course will focus mainly on micro:bit related topics and concepts, and there will not be any programming involved. Basically, it is basic level course from the ground up. For the many students that are interested to learn more about the micro:bit product as well as what it can be used to create, this course will provide you with all of that and more. By the end of this course, you will have become a maestro of micro:bit. We're very sure of that!
Like in our previous article that introduces both this beginner level course as well as the intermediate course, we have mentioned two very important micro:bit compatible kits that we will be using throughout the course itself, so it would be very important for you to get your hands on them if you'd like to follow along with the sessions.
The first few sessions however, will focus on some basic level concepts so that there is time for you to actually get those kits. Plus you need to account for the shipping time too. Good news, is that the MakeCode user interface that you will see later in this blog article has a simulator as well, so you can still follow along and learn.
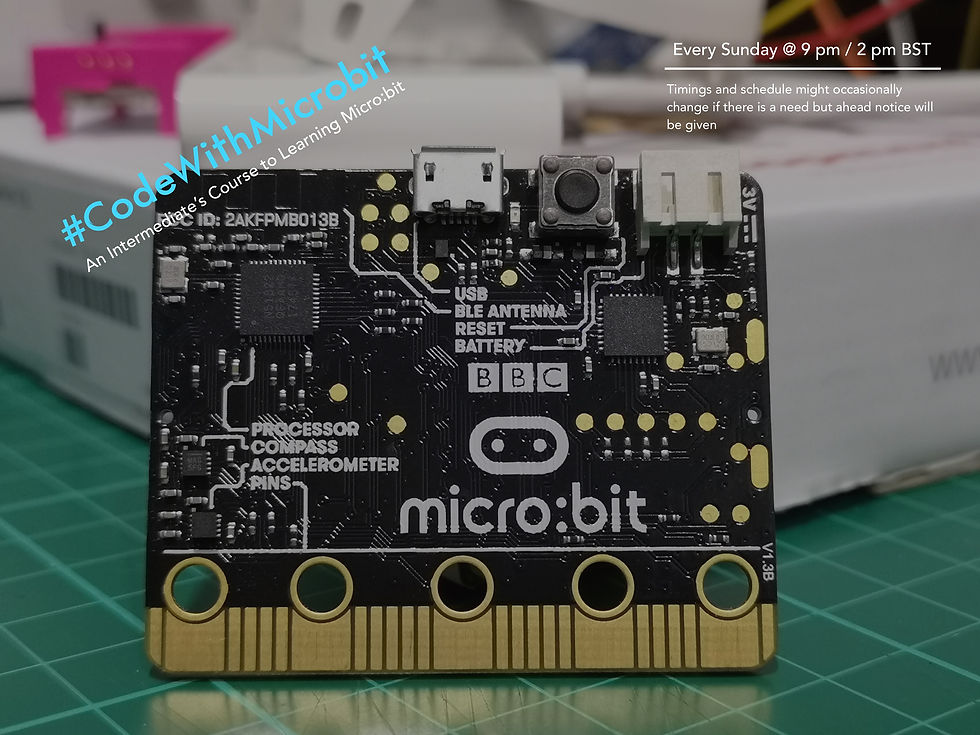
Introducing the Micro:bit Board

We've created this image on our own because we didn't want to simply pluck the images off the internet and steal it from other people. Instead, we're happy to actually put in some effort and work in describing what some of the parts can do, and what they are for.

And finally we have the top side of the board, which consists mainly of two buttons, the LED display in the center. The plug pins at the bottom of the board where you can slot it into an Edge Connector Breakout board to access more of the pins.
Taking a First Look at the MakeCode Interface
After taking a look at the hardware itself, now we will explore the website interface created by MakeCode, which you will be using during the most part of the course to help create programs to run on your micro:bit board.

So, what are each of those numbered items?
Projects Menu - From here you can create a new project, or open up previous projects that you have created.
Share Menu - From here, you will be able to share your projects (embed) them to your personal web page, show-off your complex creation to impress your friends and family.
Choosing between JavaScript Blocks or JavaScript programming language.
Setting Options - Edit the project name, switch the theme of the interface.
Micro:bit Simulator - Probably one of the most useful features of this interface because you can actually see how something will run before sending your program to your micro:bit board itself.
Blocks Toolbox - This toolbox contains a set of different blocks that you can drag-and-snap them onto the workspace. And during the course itself, we will be sharing with you how you can make use of every single one of those blocks in your projects.
Workspace - This is your canvas where anything you imagine become possible!
Save Project - You can save your project onto your desktop PC or laptop.
Download Project - Similar to saving the project but it has a default functionality that allows you to directly build (compile) and send you program to the micro:bit board.
Undo/Redo & Zoom In/Zoom Out - If you have made a mistake, you can undo/redo what you have done with these buttons. If you need to occasionally zoom out or zoom in to focus on certain parts of the program that you are creating, you can do it here.
Summary
And so, we are done with the very first introduction lesson on the micro:bit board. If you have any questions that you would like to ask, or if you find that I have made any errors or mistakes, please do share a comment to this post.
Note: In order for people to leave a comment on our posts, we require each members to sign up first as one. This is to help us regulate and moderate the comments that people are posting (to avoid and prevent spamming as much as possible). We really appreciate your understanding.


Comments